How to use Essential Oils on Holiday

essential oils on holidayInspired by the sprinkling of sunshine over the UK this week, it’s time to share some summertime essential oils, essential for taking on holiday.

Essential oils come in very small bottles so they are a practical addition to your luggage, even if you’re only taking cabin bags. However, it’s still worth considering which are the most useful ones to take with you, so this blog is to help you weedle it down to just a few essentials that will come in most handy.

The main issues or symptoms that are commonly experienced when travelling are: around the journey itself; skin care; insects and first aid, so here I have listed some specific symptoms, some appropriate essential oils and simple, practical ways to use them.

essential oils on holiday

TRAVEL

Travel sickness -cardamom, spearmint, chamomile (roman*)

Jetlag – peppermint, lavender

Anxiety (fear of flying) – neroli, lavender

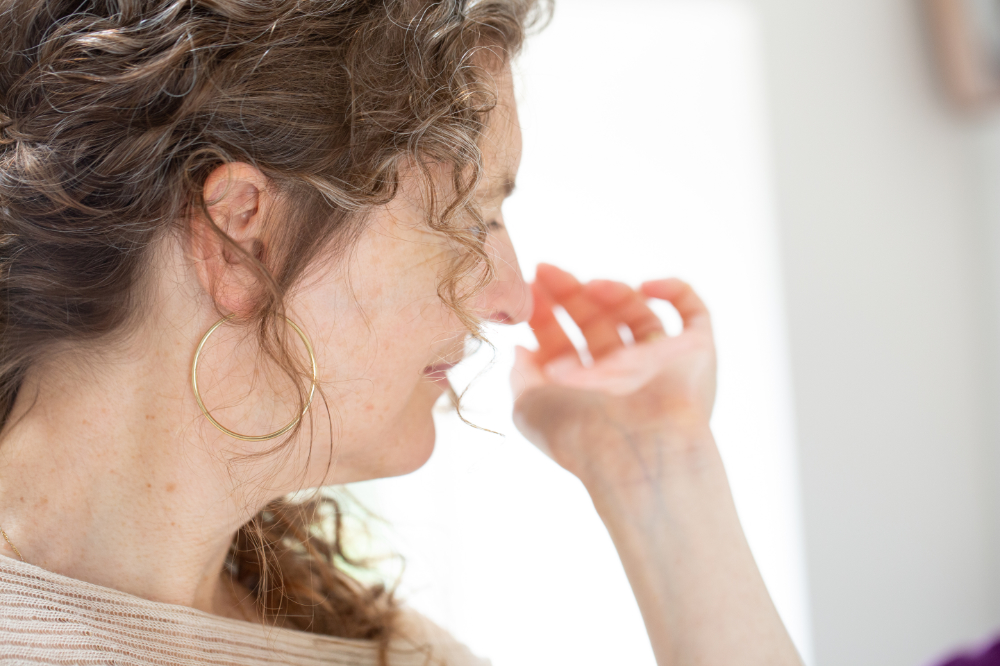
How to use – make a blend in a ‘rolette’ bottle (see how below) to roll across your wrists and tummy, or sprinkle a couple of drops on a tissue to keep in a pocket or in your bag and gently breathe in as a preventative measure or at the time of feeling the symptoms.

SKIN CARE

After sun skin care – lavender, palmarosa, chamomile (roman*)

Sun burn – lavender, chamomile (german/blue*), peppermint

How to use – blend in a base of aloe vera gel or add to your aftersun lotion, see my previous blog for Blending every day products – how many drops should I use?

INSECTS

Insect repellent – lemongrass, citronella, geranium, lavender or tea tree -use one or a combination of those you like the most.

How to use – blend in a base of aloe vera gel, add to your aftersun lotion, (see my previous blog for How many drops should I use?) or make a blend in a rolette bottle (see how below). Some of these essential oils combined would double as a perfume – I like geranium, lavender & lemongrass.

Insect bites – chamomile (german/blue*), lavender

How to use – apply directly to the affected area or as a blend in a ‘rolette’ bottle (see how below).

FIRST AID – Lavender

If you only take one essential oil on holiday make it lavender, it’s the most useful essential oil for most minor first aid situations.

It’s antiseptic, anti microbial & cleansing so ideal for first aid, it is particularly effective on burns, so great for skin care and after sun, it’s ‘insecticidal’ so will deter insects and is very relaxing and calming so it helps with easing travel sickness and tension.

It’s also nice to sprinkle a little in hotel rooms if they don’t smell lovely, especially on the pillow.

For more details on how to use lavender essential oil, see my previous blog on ‘Lavender, Essential First Aid’ .

rolette bottle

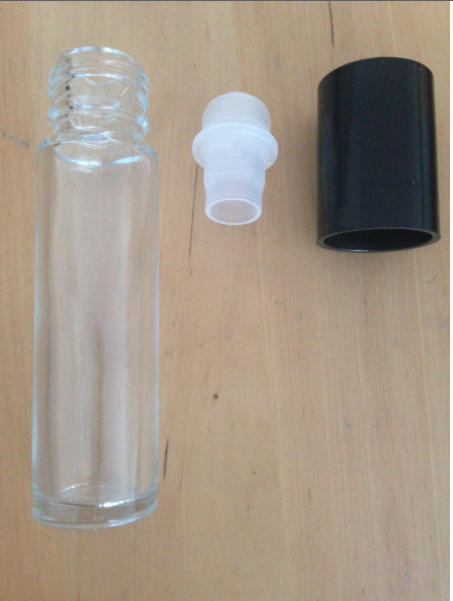
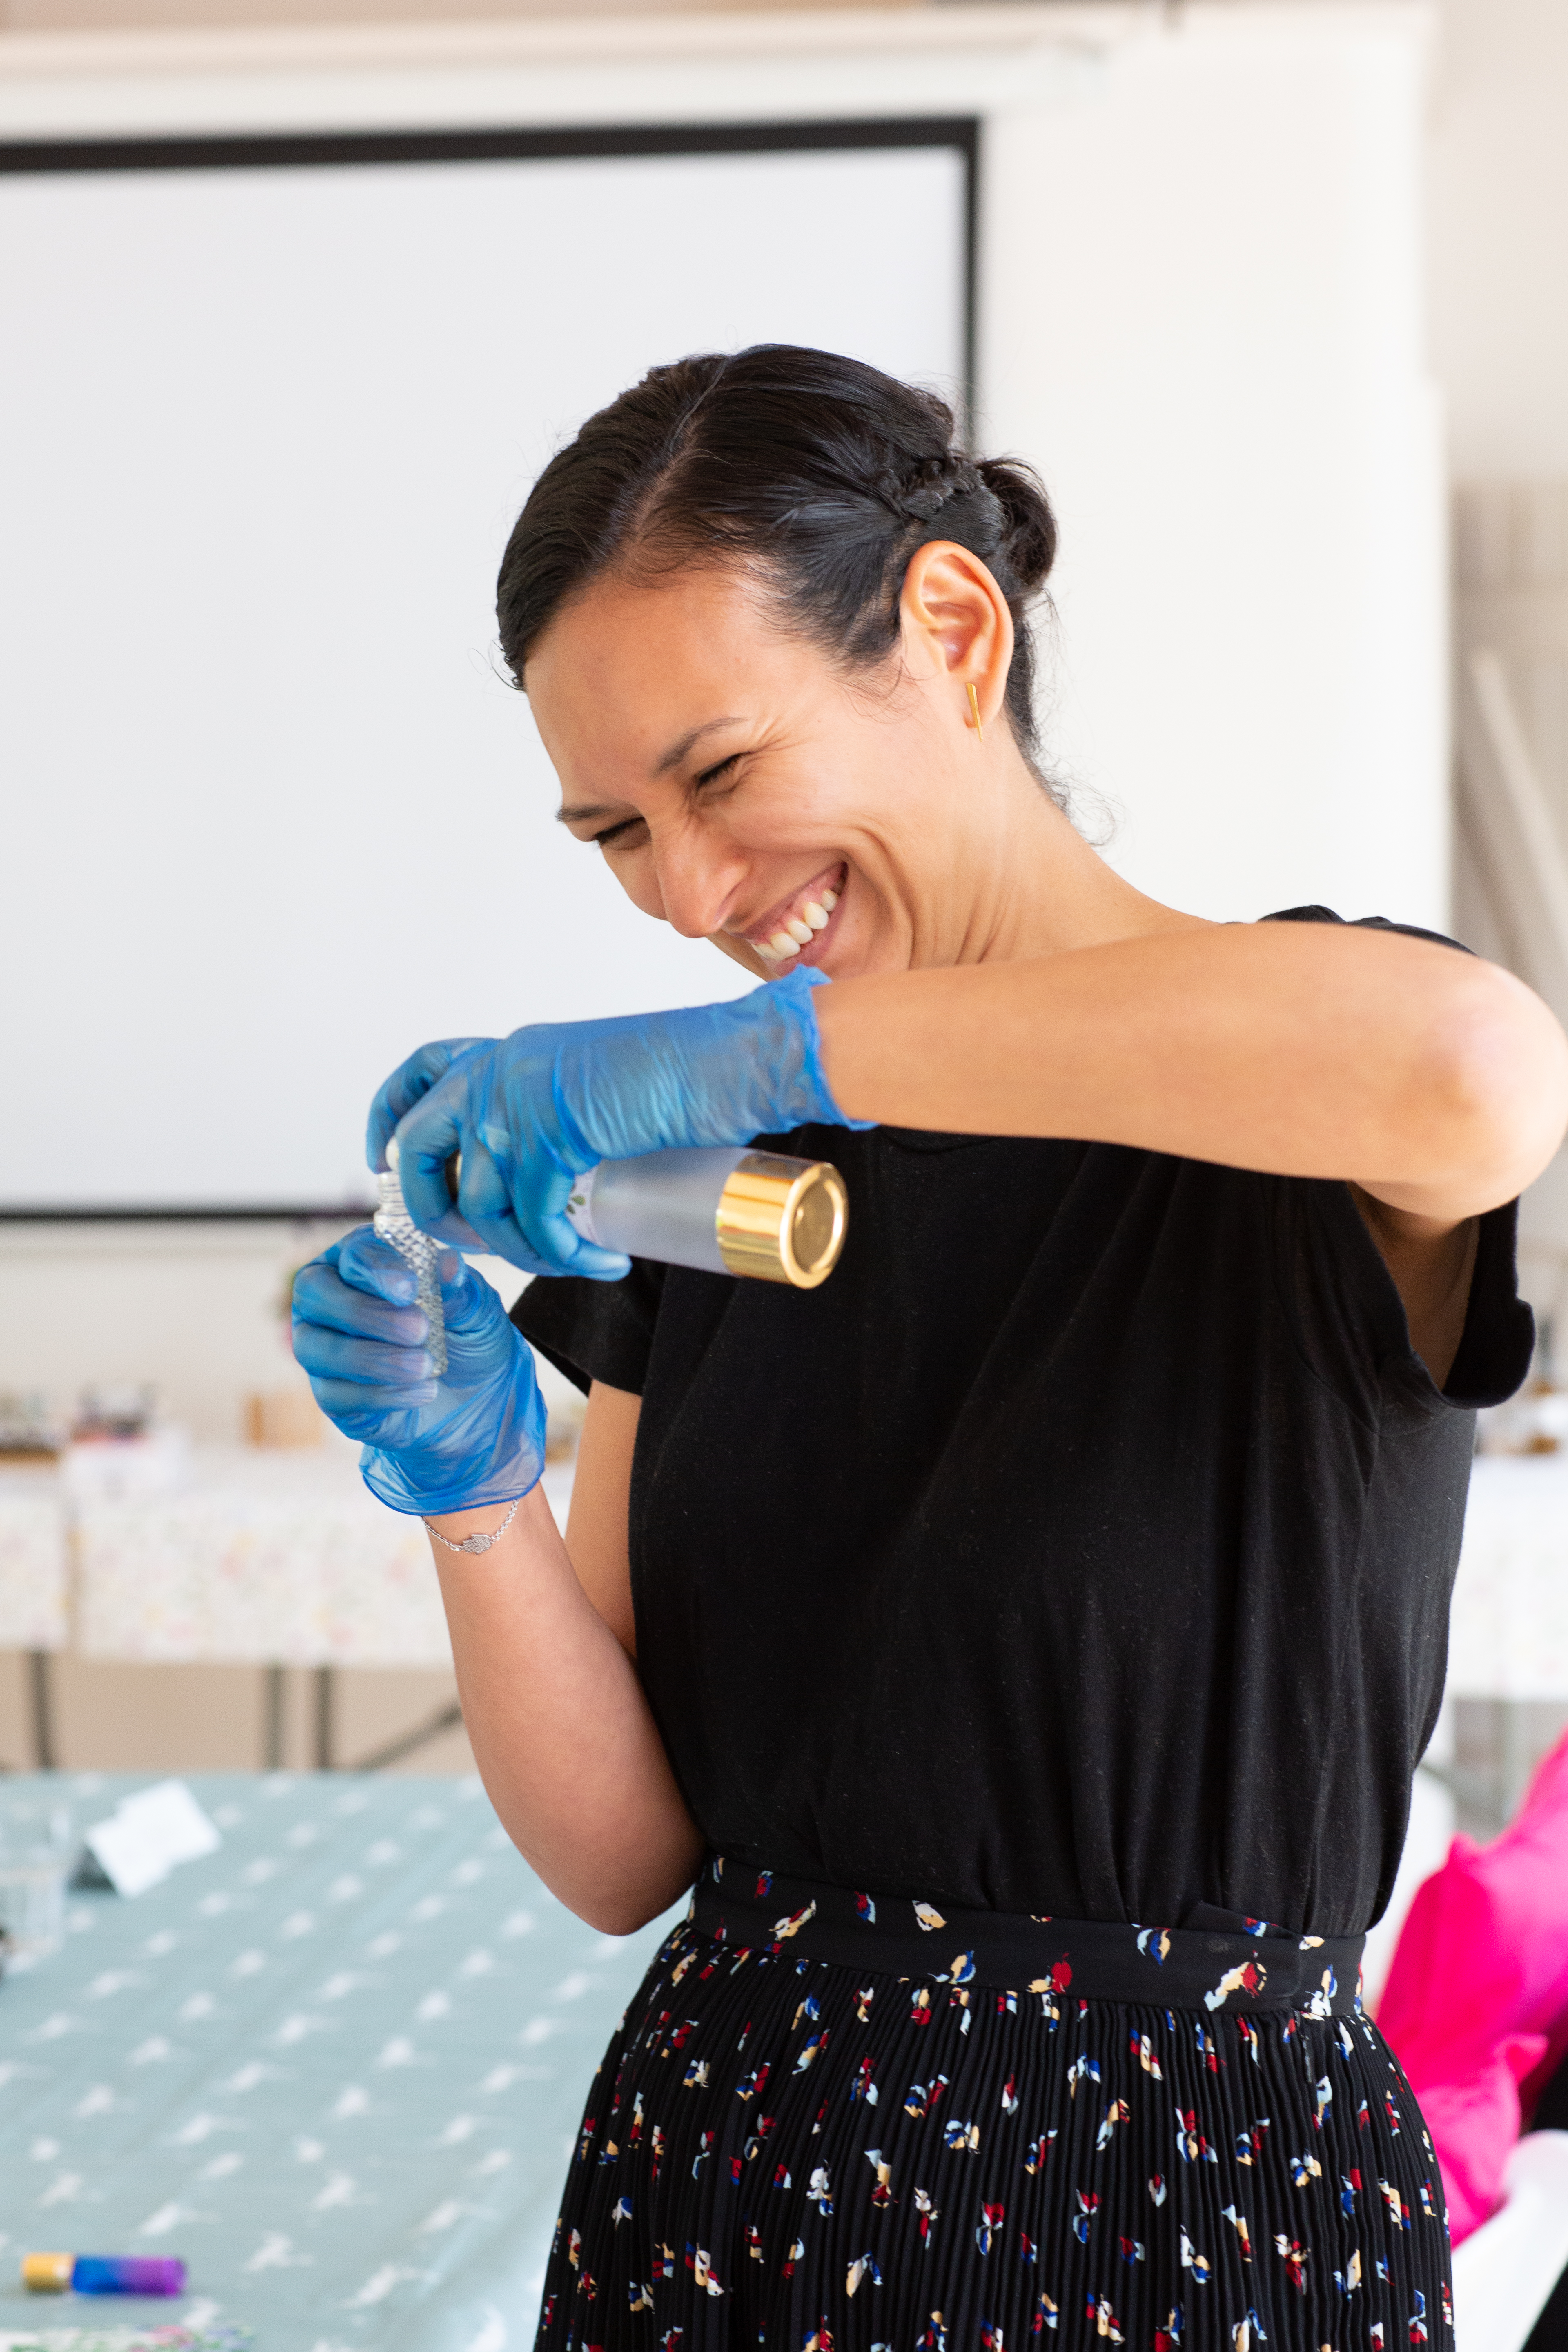
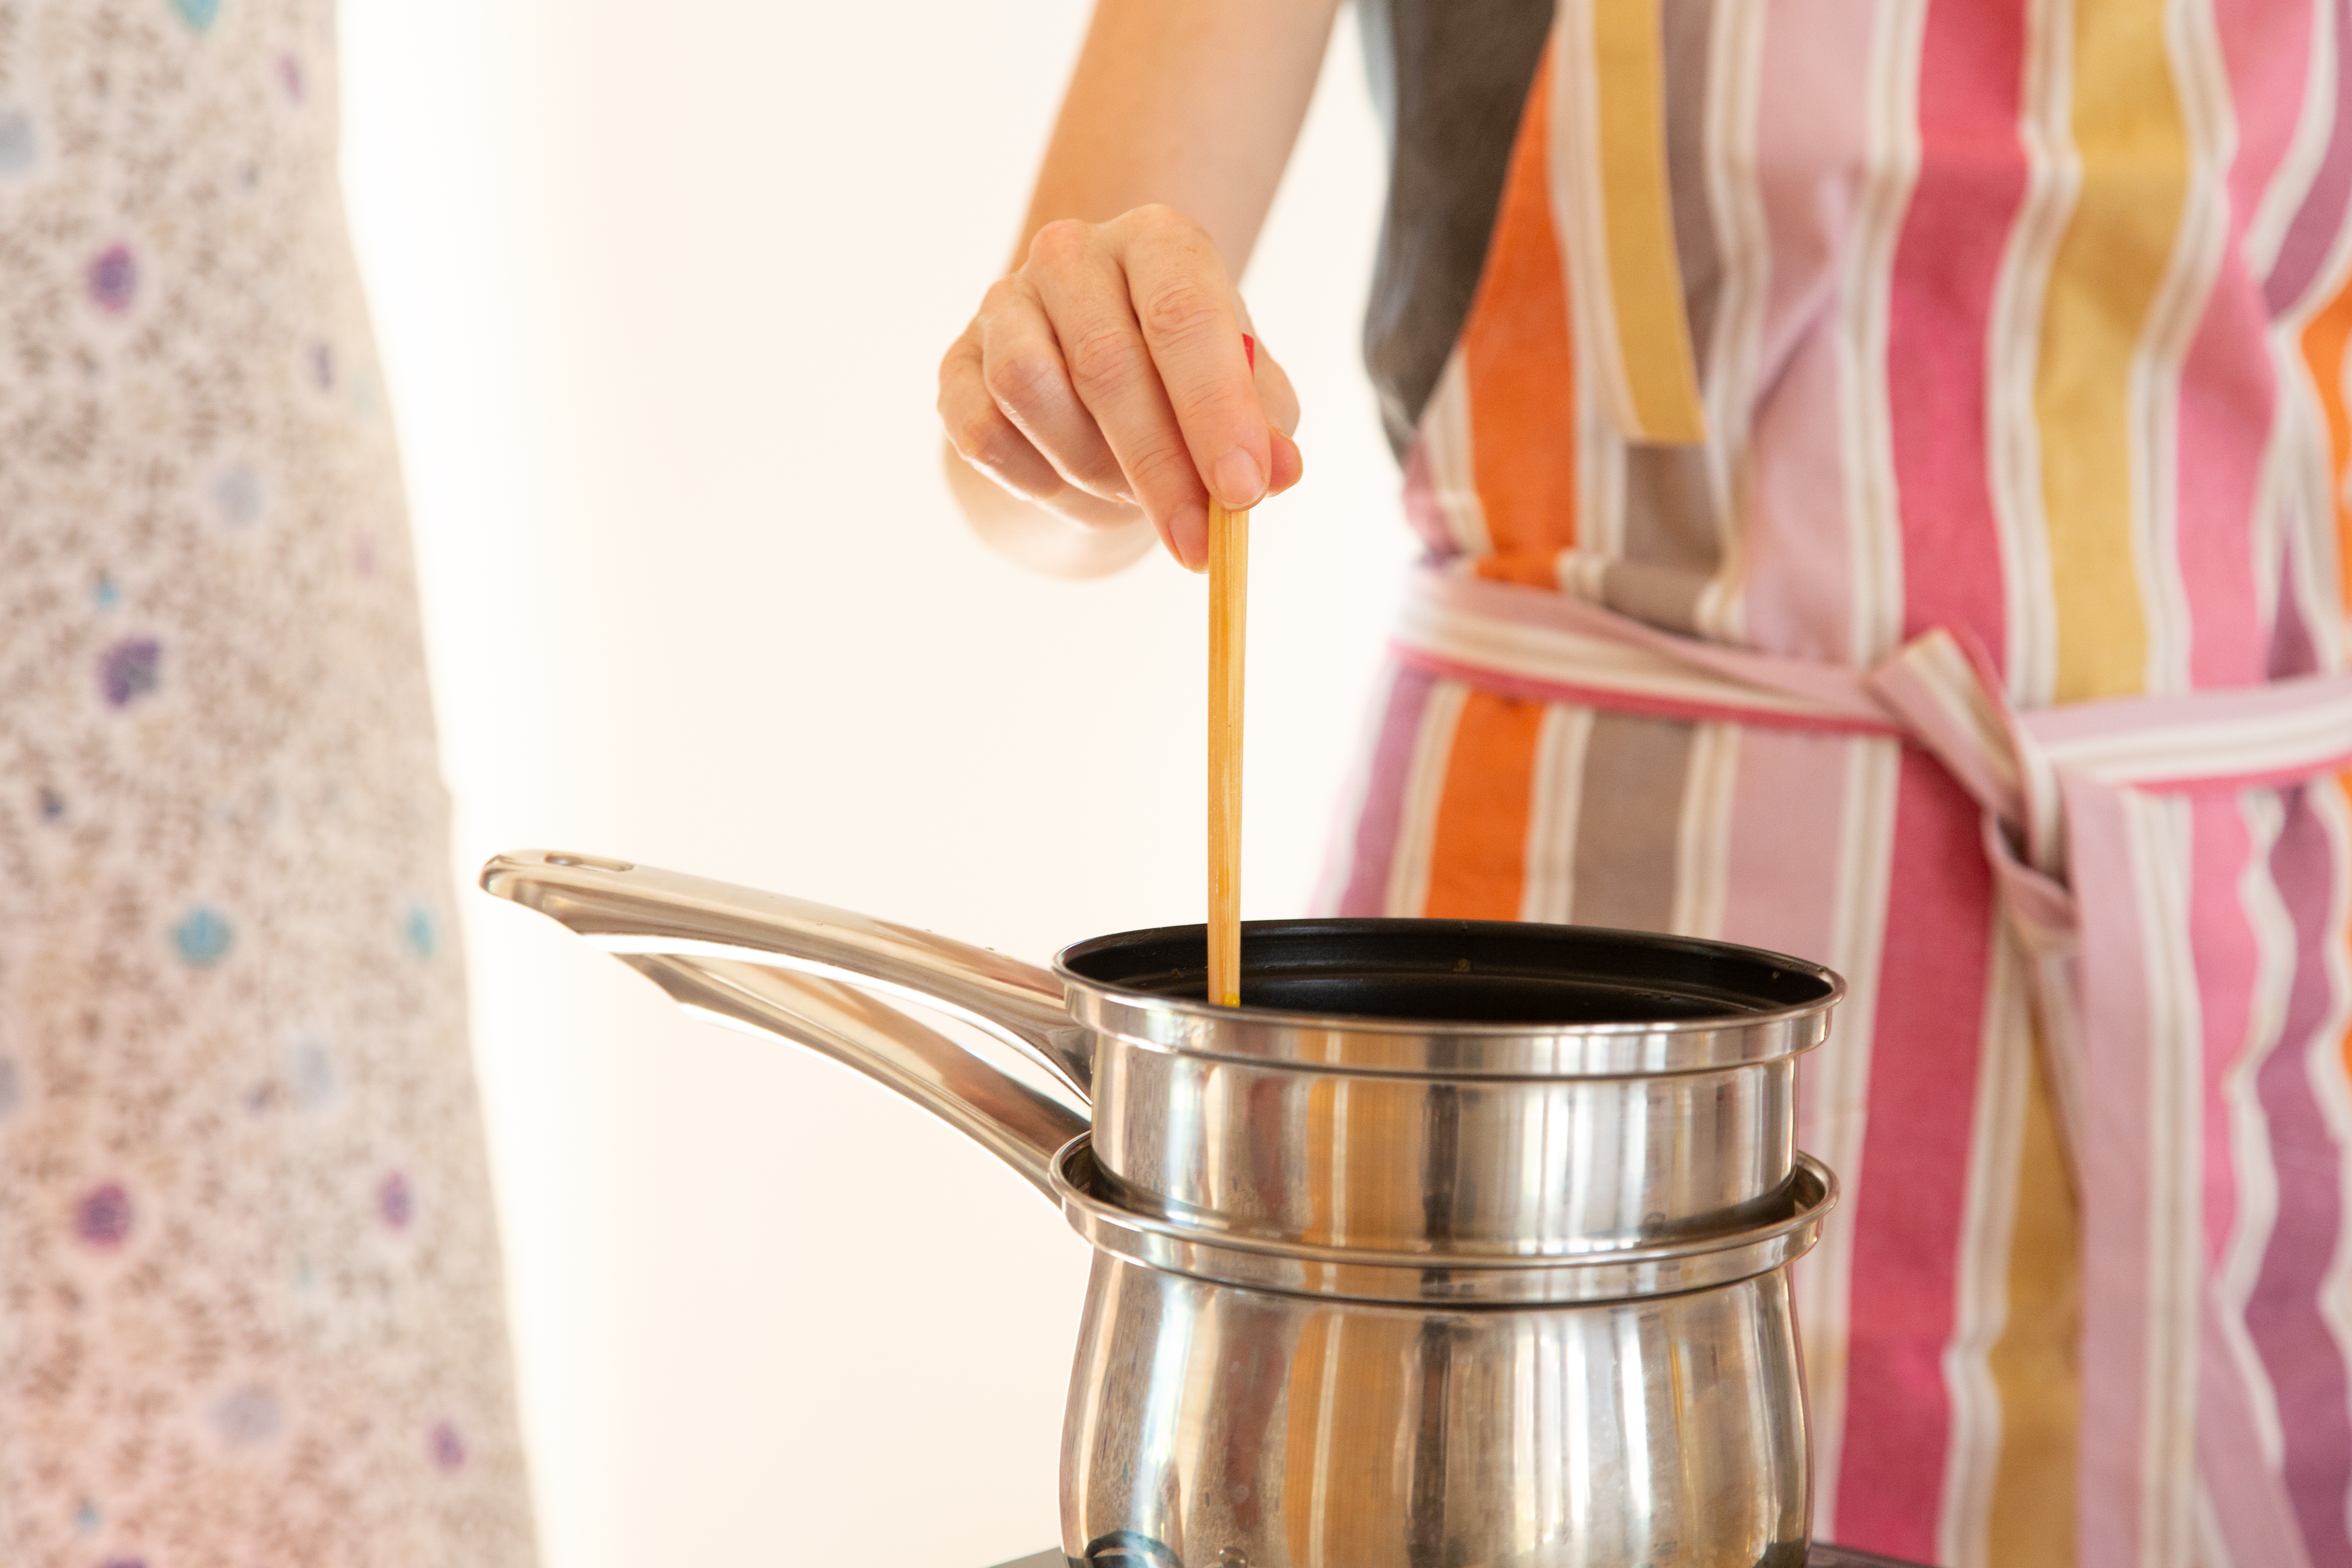
Rolette Bottles – here’s how to prepare a rolette bottle:

Using a ‘rolette’ bottle (as pictured) is very practical as you can keep it in a pocket or handbag and it is easy to use. It comprises of a small glass bottle (10 or 15ml), a roller ball top (that releases a little oil across the skin when you pass it over), and a cap.

Instructions

Fill the bottle with a base oil eg. olive oil, then drop appropriate essential oils directly into the bottle, if you have a 10ml bottle, then you will need between 2 and 10 drops of essential oil, see my previous blog for more details on How many drops should I use? Fix the roller ball cap and lid and give it a shake to disperse the oils evenly.  Make a label for the bottle so you don’t forget what it contains.

chamomile & blends

Holiday tip: Rather than take bottles of essential oils you could prepare the blends that you are likely to need in rolette bottles and take these with you instead.

* Chamomile roman or blue/german – There are two types of chamomile essential oil: roman chamomile is more gentle, and german/blue chamomile, which is deep blue in colour, is more powerfully anti-inflammatory in action. I have recommended the german/blue chamomile for sunburn and insect bites, but the roman chamomile is also suitable in each instance.

Click here to order bespoke blends of essential oils ready made for your holiday requirements.

Travel Tips: here’s a blog to help you in general with how to pack your suitcase: ‘Travel Suitcase – What to Pack?

The Art of Blending Essential Oils

My main purpose with this blog is to help you to develop your own relationship with using essential oils and experimenting with blending is one of the most fun aspects of this, there is constant opportunity to learn, be creative and experiment.

Introduction – choosing ingredients.

Creating a blend can be a lot like cooking, I like using this analogy as most people are familiar with making things in their kitchen and blending essential oils is very similar in lots of ways. Instead of using the dried herb or seeds to season your meal, you’re using the oil, that has been pressed or distilled from the plant, to enhance your bath oil or face cream etc. One of the main reasons I choose and use essential oils on a day to day basis is to nourish and support my body, often the same reason I choose to eat certain foods (although I have to admit -sometimes I eat for comfort or distraction but that’s another story).  Ultimately, my intention when cooking or blending essential oils, is to make something that supports my body, wether it’s specific symptoms I’m addressing or I just want to enjoy the oils in a nurturing, confirming way through out my day.

Inspiration

Honey And Rose Panna Cotta with subtle flavours of rose and cardamom. Photo care of Unimed Living
Honey & Rose Panna Cotta with subtle flavours of rose and cardamom. Photo care of Unimed Living

Food often inspires me when I’m creating blends too and this recipe for Honey & Rose Panna Cotta is a great example, as after my mouth stopped watering, I made a blend of almond oil with rose and cardamom essential oils. It gives a middle eastern feel, very soothing, refreshing, deeply nurturing and nourishing in the bath, or as a massage oil.

Click here > for the Panna Cotta recipe and more inspirations.

Preparation

I love putting together blends of oils and I also love cooking, but I don’t always have as much time as I would like, and I can allow it to feel like just another task I have to fit into my day. So, for moments like this, I like to have some pre-made blends that I can use so that I’m not making things in a rush, or with out the quality and integrity I know I can bring when I make the space to do so with out any pressure. Just like when I don’t feel like cooking, I have lots of soups or curries in the freezer I can eat, so I still get a lovingly prepared meal, when I most need it.

Blending rules

The rules are there are no rules! -Well, that’s not quite true, because essential oils are incredibly potent, so you do need to observe any cautions  or maximum doses they may have, (see List of Essential Oils for cautions).

Your essential essence…

Whether I’m making something for a specific medical condition or just a lovely bath blend, I like to go with what ever I feel. I have noticed that different people have their own style when blending and when watching them I have been surprised at the combinations they come up with, things I would never have tried myself, yet they work perfectly. Each person can bring their own unique essence to a blend,  a little bit like with cooking; if a group of 100 people made a lasagne, not one of the meals would turn out exactly the same, they would each have their own way of doing it, from ingredients to presentation and all the details in-between. In the same way, if I asked someone  (even a qualified aromatherapist) to make a blend for a cold or for eczema, they would each end up making a unique product. Even if they did happen to choose the exact same oils, they could still have a different ratio, a different base and different method of application, each person brings their own essence and style to the blend.

The oils are so versatile, with many varied properties and effects, so there is certainly no right or wrong oil in any circumstance (apart from using an oil when there is a caution). Some oils have a more intense scent than others so you might choose a lower ratio to allow more delicate oils to come through, but then the scent could still work with even ratios, it would just have a different character and balance -for details on balancing the blend see my blog post on Top, Middle and Base notes.

Good practice

As you play around and get to know essential oils, your style, what you like and what works for you, I recommend that you record your recipes. I have a little ‘blending’ note book to write everything in, and I make sure I record the number of drops and the rest of the ingredients. This is because you might end up with something you really love, or a blend that someone asks you to re-create, then you have all the details handy to make it up again. I’m speaking from experience of course which is why I have developed a slightly more organised way of working. It means if I decide I want something to be a little more lavender, I can refer back to how many drops I used, and increase them.

I am also a big fan of the ‘Jamie Oliver’ style of making recipes, a shake of this, and a splodge of that as I have sometimes found myself stuck using the same oils and techniques in the past. Just watch out for essential oils that have maximum blend strength cautions and most of all, have fun!

Useful blogs for blending:

How many drops should I use? -this blog will help you to choose the appropriate blend strength depending on the purpose of your product.

Blending Essential Oils using Top, Middle and Base Notes – this blog will help you understand the practise of making a well balanced blend.

List of the most popular Essential Oils, their Uses and Cautions. -this blog will help you to choose which essential oils to use, depending on the purpose of your product.

How to Blend Essential Oils using Top, Middle and Base Notes.

Many people like to put a blend together by using a top, middle & base note. This is typical in perfumery, but also popular in aromatherapy, as people like to get a ‘well rounded’ scent. It basically means that the blend is put together with a range of oils or scents that will come into play at different times -at the beginning, middle and end. It’s not something I consciously try to do, as I like to focus on the purpose of the blend and choose oils for their qualities, but it can be a useful guide especially when you are building confidence and experimenting.

Top notes you will smell immediately, I like to think of them with their molecules widely spaced and jumping around a lot, so when you take the lid off a bottle of perfume, they are straight out of the bottle and are the first to enter the nasal passage and be recognised by the sensory nerves. Examples would be oils like lemon, lime and other citrus oils.

Middle notes will come through after a little time, I like to think of their molecules as more evenly spaced and a little more stable. A middle note would often be floral oils such as lavender and rose and herby oils like basil and thyme. Put simply, something in-between a top and base note.

Base notes may not be immediately apparent.  As their molecules don’t move around very much it takes time before you are able to recognise the aroma. They have the benefit of lingering long after the top note has disappeared and often at the end of the day, if you still smell perfume on your skin then you are just left with the base notes. Examples would be woody oils like sandalwood and myrrh. If you smell these from the bottle the scent is very subtle, if it comes out of a cold place you often can’t smell a thing but when it’s warmed on the skin it begins to take shape.

Don’t feel like you have to make the blend tick all the boxes to get it right, you don’t want it to reign in your creativity, so if you feel like putting 3 middle notes together or just base and top notes, then go for it, the blend will have it’s own unique quality.

Useful blogs for blending tips:

The Art of Blending Essential Oils – an expansion on how to out blends of essential oils together.

How many drops should I use? -this blog will help you to choose the appropriate blend strength and number of drops to use depending on the purpose of your product.

List of the most popular Essential Oils, their Uses and Cautions. -this blog will help you to choose which essential oils to use, depending on the purpose of your product, including which ones to avoid.

A List of the most popular Essential Oils, their Uses and Cautions.

A list of the most popular Essential Oils, their Uses & Cautions (in alphabetical order).

To help you choose which essential oils to use in what ever you’re making, be it bath blend or room scent, here is a list you can refer to with some of their most useful properties and any cautions you need to be aware of.

I will be constantly updating this list, so if there are any essential oils that do not appear yet or that you would like more details on, then please contact me, or comment on the post and I can add to the list.

  • Basil (sweet basil) ~ Supports digestive problems, another great oil for a tummy balm blend. Read more on using basil in a digestive massage here: Digestive Massage with Essential Oils
    • Caution ~ Avoid in pregnancy (due to varied methyl chavicol/estragole content). Maximum 2% blend strength. 
  • Black pepper ~ Similar to eucalyptus in effect – powerfully clearing, specifically great for respiratory system, especially lungs. Also great for muscle aches & pains but black pepper is much more warming and gentle than eucalyptus. A lovely oil to use in the evening in a bath blend, or if you feel you are run down or ‘coming down’ with something.
    • Caution ~ possible irritant to some in high dose.
  • Cardamom ~ Gently soothing tummy aches and nausea, supports appetite and is refreshing and comforting. A great oil for children, for travel sickness or for morning sickness. Read more on using cardamom to soothe digestion here: How to get through December and still smell Divine… with the most Delicious Essential Oils!
  • Chamomile (german) ~ Very anti-inflammatory, so perfect for any condition with inflammation from bumps and bruises to arthritis and gout. It’s also good for skin inflammation especially bites, but Roman Chamomile ay be more suitable if it’s for delicate sore skin, as it’s more gentle.
    • Caution ~ Sensitisation possible, avoid with ragweed allergy.
  • Chamomile (roman) ~ Gentle, soothing and calming, great for very delicate skin, and skin conditions. Relieves itching, and allergies.  See my blog on Chamomile for Skin Conditons  for more details. A great oil for children.
    • Caution ~ Potential sensitivity to those with ragweed allergy.
  • Clove ~ Very powerful pain reliever, especially where there is nerve pain. Useful for toothaches and for warming and releasing aches and pains. Read more on using clove oil for cleansing the room here: How to get through December and still smell Divine… with the most Delicious Essential Oils!
    • Caution ~ Maximum blend strength 1%. Sensitisation possible. Caution with hyper sensitive, diseased or damaged skin & with blood clotting disorders. Not suitable for children under 2 years.
  • Eucalyptus (globulus) ~ Powerfully clearing, specifically great for respiratory system, especially lungs. Also great for muscle aches & pains.
  • Eucalyptus radiata ~ this species of eucalyptus is more gentle than the globulus, so I would use it with children, elderly, or if someone feels the globulus is too fierce.
  • Frankincense ~ A fantastic skin oil, very good for dry and mature types. Also good for calming and focusing on breathing so very useful in a burner to scent the room and to help calm anxiety. Read more on using frankincense oil here: How to use Essential Oils from Trees to Support our Respiratory System and in Skin Care.
  • Geranium ~ Very sweet and feminine, balances the endocrine system, a great oil to use to support females cycles and any hormone related issues, including irregular periods and menopause. A very lovely, sweet and fresh oil for young women. Read more on using geranium oil here: How to Use Geranium Essential Oil to Support Women’s Health
  • Lavender (Lavandula angustifolia) ~ Powerfully cleansing and clearing. Helps clear stress and tension. Great for supporting sleep. Very anti-microbial and great natural antiseptic. Since lavender is so versatile, there are several blogs on using lavender to help you make the most of it:
  • Lemon ~ Cleansing and detoxifying, ideal for using in a face cleansing balm (with lavender). Fantastic oil to use in a burner to cleanse and brighten the atmosphere especially when someone is sick.
    • Caution ~ Phototoxic, meaning it reacts with sunlight (and sun beds), so avoid use on skin if exposed to sunshine. Citrus oils have a shorter shelf life, meaning they react with oxygen much quicker and can cause sensitisation and irritation.
  • Mandarin ~ Very gentle to the skin, soothing and calming, a lovely one to add to an evening blend or for use in a blend for stretch marks. A great oil for children. Click here for the stretch mark balm recipe including mandarin oil: How to make a Stretch Mark Balm
  • Myrrh ~ Deeply healing skin oil, especially for festering, difficult to heal wounds.  Great for connecting to and supporting breathing very gently. See my blog on Myrrh Essential Oil for more details and Gargling with Myrrh for oral problems.
    • Caution ~ Avoid in pregnancy, although can be useful in 3rd trimester to prepare for birth -seek professional advise here though.
  • Neroli (orange blossom) ~ Apart from smelling completely beautiful and delicate, it is very soothing and calming to the nervous system, and so has an amazing effect on all that the nervous system controls, so this would include digestion, muscle tension & emotions. It is a great oil for melting stress, and anxiety.
  • Peppermint ~ Great for muscle aches and pains, sometimes has a tingling sensation, great for refreshing feet. Supports digestion, would make a great tummy or foot balm. Read more on using peppermint oil in a digestive massage here: Digestive Massage with Essential Oils
    • Caution ~ Do not use if cardiac fibrillation. Maximum blend strength 3%. Avoid use with babies.
  • Rose (Rose otto – Rosa damascena or Rose absolute – Rosa centifolia)~ Deeply nurturing, great for those self-loving moments. Very supportive for women and men. A gorgeous oil to use in beauty and skin care, particularly for mature and dry skin. Rose is one of my favourite oils so here are a few blogs to learn more on this exquisite oil:
  • Thyme (Mild – Thyme linalool)~ Powerfully anti-microbial, and anti-fungal, great for coughs, especially deep chesty ones. A fantastic oil to include in a blend for athletes foot.
    • Caution ~ Use this mild version of thyme. Avoid use on hyper sensitive or damaged skin. Do not use with children under 2 years. Maximum blend strength 2%.
  • Yarrow ~ this unusual bright ink blue oil is highly anti-inflammatory and is great for any conditions where inflammation is present e.g. gout, arthritis, allergies, pain, breaks, strains. See my blog on Yarrow Essential Oil for more information.
    • Caution ~ yarrow can contain a varying amount of camphor in it, which means it is advisable to avoid with epilepsy, in pregnancy, and could cause sensitisation in ragweed allergy sufferers.

Note: Always ensure you buy good quality essential oils from a trustworthy source. Check out my own range of carefully sourced essential oils from organic farmers and artisan distillers: Essential Oils by Laura Hoy

How to make a Massage or Body Balm

A balm is a great way to use essential oils on the skin, it’s simple to make, easy to apply and feels lovely. It can also be used in a variety of ways, I have included recipes for ‘chest’, ‘pain’, ‘cleansing’ and ‘beauty’  balms below but you can tailor the essential oils in the recipe to suit you personally, (see my webshop for tips on essential oil properties and uses for help choosing).

The following recipe makes a good consistency for general use.  It is fairly soft, so ideal for massaging into the skin on your face and body as a nourishing treatment and as a massage balm to lubricate the skin and nourish during massage.

Recipe for a basic Balm – to make 100g  (for 2 x 50ml pots).

  • 10g Beeswax
  • 10g Shea butter
  • 80g or ml of base oil, e.g. Olive oil or Almond oil
  • Essential oil(s) of your choice (up to 2.5ml, see below for inspirations and how many drops to use)
  • Vitamin E, 5 drops (optional)

About the ingredients:

As well giving the balm it’s consistency, beeswax gives a protective and nourishing feel.  Shea butter gives it a creamy smoothness. And then there are the base oils, I usually use almond, apricot or olive oil, which all give it a lovely nourishing feel, but feel free to substitute with what ever you have handy or to experiment with various types, (see my shop for carrier oil properties & uses for help choosing). Vitamin E is a natural preservative so will help your balm last longer (approx.18 months), I use a soy (GMO free) derived version.

You can buy most of the ingredients from myself, except for the beeswax, which I buy from local bee keepers or honey sellers. I would recommend buying the beeswax in pellet form or sheets, as it’s easier to manage, solid blocks are difficult to break up and get the correct amount.

You can adjust the ingredients to suit you as you wish, if you want it softer (for a cleansing balm*), use less beeswax (5g), and if you want it harder (for a lip balm) then use more beeswax (15-20g).

Equipment

  • Scales
  • Measuring jug
  • Bain marie (a sauce pan for heating water with another pan on top so ingredients are heated gently by the steam to avoid heating ingredients directly).
  • Pots (2 x 50ml glass jars)
  • Chopstick for stirring and blending

Instructions

  • Sterilise the pots by putting boiling water in them for a few minutes, then empty and ensure they are completely dry. This is important as the balm can go rancid if mixed with water.
  • Weigh out the beeswax and shea butter using the scale and weigh or measure out the base oil.
  • Use a bain marie to melt the bees wax and shea butter, then add the base oil.  As soon as it’s completely melted remove from the heat.
  • Let it cool a little before adding essential oils and vitamin e, so they are not affected by the heat.  If it begins to solidify give the mixture a stir.
  • Pour the mixture into the containers and leave to cool and set.
  • TIP: I often pour the mix into the jars before adding essential oils, so I can make each pot a different flavour. Decide on which oils  and how many drops to add in advance, as the mix will solidify quickly once in the pots.

Useful Balm Recipes:

Here are some recipes for common uses,  just use the balm recipe above and add the following essential oils.

Chest Balm (to add to the 100ml balm recipe above) this recipe is not suitable in pregnancy, get in touch for a more gentle option.

  • 2.5% blend strength for application to chest to support colds, coughs and chest infections.
  • Thyme – 10 drops (0.5ml)
  • Eucaplyptus – 10 drops (0.5ml)
  • Lavender or Spike Lavender – 10 drops (0.5ml)
  • Myrrh – 20 drops (1ml)

Pain & Inflammation Balm (to add to the 100ml balm recipe above)

  • 2% blend strength for use on specific effected areas.
  • Chamomile (german) – 20 drops (1ml)
  • Lavender or Lavandin – 20 drops (1ml)

Cleansing Balm (to add to the 100ml balm recipe above)

  • 0.5% blend strength for use on the face
  • Lavender – 5 drops (0.25ml)
  • Lemon – 5 drops (0.25ml)

You can use this balm to cleanse your face, remove makeup and grime, just rinse with warm water or a warm cloth afterwards and your skin will be left feeling silky soft.

Beauty Balm (to add to the 100ml balm recipe above)

Use at 2.5% blend strength for stretch marks and scars, and 0.5% to use as a night time nourishing facial treatment.

  • Rose – 10 drops (2.5%) or 2 drops (0.5%)
  • Myrrh- 20 drops (2.5%) or 4 drops (0.5%)
  • Lavender- 20 drops (2.5%) or 4 drops (0.5%)

You can pick as many or as few oils as you like, but just ensure the total blend strength is appropriate (see blend strength charts below).

How much essential oil to use

1% Delicate blend strength (for face, damaged, sensitive skin & children)
Amount of base product No. of drops of essential oil to add
10ml 2
30ml 6
50ml 10
100ml 20
2.5% General blend strength
Amount of base product No. of drops of essential oil to add
10ml 5
30ml 15
50ml 25
100ml 50

*Coconut oil is also useful for a cleansing balm as it’s very greasy and lifts dirt and grime gently from your skin, it’s great to use on its own for removing eye make-up.

The Beauty and Simplicity of a Hand Massage

Laura and Neave hand massage 2

I decided to write this blog on hand massage as it is such a simple thing to do with friends, family and even colleagues. It can be done anywhere, at a friends house, a coffee shop, even in bed, it’s a great thing to do if visiting some one in hospital or who is bed bound, and you can take as little or as long as you like, even 2 or 3 minutes on each hand would feel lovely. Although it’s such a simple exercise, it can be deeply relaxing, connecting and supportive as well as fun. So here are some tips on how to give a hand massage: Choose a cream, balm or oil blend to use with your partner, you can use my recipes in previous blog posts to make your own cream, balm or massage oil or just use a little olive oil or hand cream, what ever you have handy. Make sure your partner likes the scent of the product you are using, if you have a few options it’s great to get them involved in the choice as smelling the oils/cream already brings them in touch with their body and what they are feeling.

Preparation: The most important thing to prepare here is you! hm

Ensure that you are in a comfortable position that supports you, and does not compromise your body, ensure your partners position is the same.  Be aware you need easy access to their hands and ideally forearms with out stretching, and remember to have your oil somewhere you can easily reach it. You might like to use cushions, move furniture around, get a table for the oil or ask your partner to adjust themselves a little for you, it’s worth taking the time to make the space supportive so you don’t feel stuck half way through with an ache (make sure you adjust if you do).  I usually place a cushion or pillow on their lap with a towel over it so they can rest their arms across it, and only the towel will get oily, but you may need to adapt depending on your partners position and movability.  It’s important to communicate with your partner, to let them know what you are doing so they feel supported and included. Just running through what you’re doing and why, so they know what to expect is enough. You may like to ask if you can remove watches or jewellery, I usually work around rings.

Hand massage workshop

Connection: I start by placing my hands as gently as I can over theirs and give them a few moments to relax. Don’t rush, even if you only have a little time, it will make all the difference if you start by being still and just take a few moments to breath gently in and out through your nose. If you notice your partner is very tense or holding their arms very stiff, just encourage them to let go of the tension, ask them to relax their shoulders to allow the hands to let go, if they are very stiff you can ask them to make their arms go floppy.

IMG_2124

Techniques: I then choose one hand to begin massaging, and apply oil to my hands and then massage the oil over the area I intend to cover (so forearm too if this is appropriate and accessible). You can massage both hands at the same time, but I like to do one so I can lift, manoeuvre and support the hand and wrist with the free hand, although I do start and finish by connecting with both hands. I start with long oval circles over the forearms to get the cream/oil applied evenly, I make the moves firm but gentle, flowing and I always make the circles anti-clockwise -a friend once described this as a releasing motion because when you loosen a screw it’s always an anti-clockwise movement, and it is clockwise to tighten it up.

IMG_2118

I like to massage each little finger as delicately as possible, hold their hand and do little circles with it to loosen the wrist, and press into the palm with my thumb in circles. One of my favourite moves is to sandwich the hand between my hands and to very, very slowly slide them off. There are lots of techniques to experiment with, so just do what you feel, stay focused on what you are doing, and connected with your partner. Be playful, ask them what they like and see what you like.

Being very gentle does not mean that the massage is less effective than pushing hard,  it feels like I’m allowing and encouraging their body to learn to relax itself, rather than forcing it to with pressure.  If the body can relax itself, then it is more likely to be able to continue this state.

Laura and Neave hand massage 1

Preciousness: As you are face to face to your partner it is easy to talk to them, but keep the conversation related to the moment, how they feel and what their body is saying.  Sometimes just the touch or eye contact is enough, in my experience they often close their eyes and become deeply relaxed. This can be a really precious time with your partner who ever it is.  In the below image I am with my niece, we were only massaging for a couple of minutes but you can tell from the shot it was a magical moment, she also started to give massage afterwards on others and followed my moves perfectly, very beautiful : )

Accessories: A little addition to the treatment that I have come up with recently to support letting the tension in the shoulders go, is using heated healing eye pillows, I just warm them up on the radiator or in a towel warmer, and place them over the persons shoulders before I begin, one on each side across the bits that get very tense and hard – they feel gorgeous! You can buy them from Feather Light Productions website in Australia who also sell a body wrap that I’m about to try out as this will cover the entire shoulder area.  Tension across our shoulders is very common and we can all feel the release as soon as we let go of that tension, so it’s a great way to support this.

HEP-019FLP-HBW-taxonomy1

I have been working on community projects for the last couple of years mainly involving hand massages and have had such great feedback from the clients that I have started developing workshops and bringing hand massage to many other situations including at work and home. Most of the photos were taken at a workshop I ran recently, during the time everyone one was giving hand massage (with balms they had just created themselves) the entire room felt completely still, it was absolutely gorgeous.

If you have just 5 minutes with a friend to try this out, I’m sure you will enjoy and feel the difference in your hands and how relaxed you feel. We can be very careless and rough with our hands, so it’s a great way to bring a care and attention back to a part of our body that we use so often.

With thanks to Neave, Molly, Jean, Louisa, Ellen, Kathie, Sonia, Alison, Betty, Heather & David ~ all starring in the photos above.

You might also like to read my blogs on Taking care of your hands, Essential oils in hand & nail care and Myrrh essential oil- supporting connection with my wrists.

Essential Oils on Film

Sorry film footage is no longer available to view, hope to update soon…

‘Sunday Brunch’ Channel 4 TV show appearance, Sunday 2nd November, 2014.

IMG_2049

On live TV, sharing with presenters, Tim Lovejoy and Simon Rimmer, some useful information about using essential oils including:

How essential oils are made by steam distillation:

IMG_2058

How herb & spice oils support digestion,

IMG_2042

Why it’s important to enjoy the scent,

IMG_2053

Why rose essential oil is so expensive and how wintergreen essential oil is great for helping muscles to relax.


How to Carry Out a Patch Test with Essential Oils for Sensitive Skin

Essential oils are highly concentrated and can sometimes cause irritation and are generally diluted before using them on your skin.

Even when diluted essential oils can cause reactions to more sensitive skin types and so carrying out a patch test before using the oil in certain circumstances is recommended.

When to carry out a patch test?

It is worth carrying out a patch test before using essential oils on your skin in the following situations:

  • if you have very sensitive skin,
  • if you are generally prone to allergies,
  • if you have very young or aged skin,
  • if your skin is diseased or injured.

How to carry out a patch test:

  • Mix a very small amount of the blend you intend to use. (See blog post on blending for safe blend strengths).
  • Using the inside of the forearm, apply a couple drops of your blend to the pad of a band aid and keep the bandage on the skin. After 48 hours remove the bandage and check for irritation.
  • If the skin under or around the bandage becomes red, swollen, itchy, or develops blisters, that is a reaction and you should avoid skin exposure to the blend you tested. 
  • You can remove the bandage as soon as you become aware of a reaction, you do not need to leave it on for the full 48 hours.

Note: It is generally accepted that lavender and tea tree essential oils can be used neat on the skin, and they are very useful to apply to minor first aid situations, like small burns, cuts, spots, bites, but again it is worth carrying out a patch test if you have any of the above mentioned conditions.

Diluting essential oils in a base oil (eg. Olive oil, Almond oil) is ideal as they themselves have many nourishing properties that your skin can also benefit from.  Generally they are full of vitamins and fatty acids that help keep skin healthy and vital.  They also help the essential oils absorb into your skin more easily.

You do not need to dilute essential oils when using them in a burner, diffusor or for inhalation, in fact using a base oil in a diffusor may damage it.

How to Gargle with Myrrh Essential Oil

Gargling with an essential oil is useful for helping various oral health issues, but it’s important that the essential oil is diluted in olive oil (or another base oil) before being added to the water as the essential oil doesn’t dilute in the water itself and is too concentrated to be in direct contact with the delicate lining of your mouth.

There are two recipes here, one is for acute oral health conditions, where you would use a higher dilution for a period of a few days while the condition clears, for example: sore throats; coughs; chest infections; mouth ulcers; laryngitis; gum disease; halitosis and oral thrush.

If you want to use the gargle as part of your day to day mouth care routine, then use the lower dilution recipe, this would be suitable to use after cleaning your teeth for general mouth health & fresh breath.

Mouth Gargle Recipe – dilution for intense treatment:

All you need is a trusty egg cup (or any little container to hold enough water for a mouth full),

  • two drops of myrrh essential oil (or lavender essential oil – or one of each)
  • half a tea spoon of olive oil (3ml)
  • some water (enough for a mouthful),

Instructions:

Add two drops of myrrh to the olive oil and blend evenly. Fill the egg cup or small container with water, and add the mix of olive & essential oil, then take the water into your mouth, and gargle for as long as you can.  Do not swallow.

Mouth Gargle Recipe – dilution for general every day use:

Use the following recipe for a natural mouth wash after cleaning your teeth:

  • one drop of myrrh or lavender essential oil – use peppermint essential oil for an extra fresh feeling.
  • one tea spoon of olive oil (6ml)
  • some water (enough for a mouthful).
Click here to buy Myrrh Essential Oil
Click here to buy Lavender Essential Oil.
Click here to buy Peppermint Essential Oil.

How to use Myrrh Essential Oil – Connection and Massage

Myrrh essential oil is a great oil for supporting connection with self, its subtle aroma encourages a level of stillness to allow an appreciation of the scent. Gently massaged around your wrists brings focus to this delicate area of the body. The oil is made from a resin produced by the Commiphora myrrha tree; when the bark of this tree is damaged or cut the resin is released to seal the wound and this action is mimicked by the essential oil which is used in deep and difficult to heal wound care.

leonardo-da-vinci-paintings-and-drawings-hands-of-mona-lisa-1503

I wanted to share my recent experience of using myrrh essential oil in a cream, or an oil, and massaging it into my wrists. My wrists feel very delicate and precious, and it becomes natural to do this massage very tenderly and to really take the time to feel my wrists.

My wrists seems to be a piece of my body that in the past I hadn’t given much focus to. A friend of mine, Chris James, made a point of getting people to feel their wrists during one of his workshops (his workshops are an amazing way to really connect with your body and your self).  He literally kept saying ‘Feel Your Wrists’ throughout the entire weekend.  It resonated with me and I started to notice many points through out my daily life that my wrists were being used.  Right now as I type on my key board for example, and when I’m driving in my car, these were initially two very obvious moments that were easy to bring attention to my wrists during the day.  As I began to notice them more, I actually realised how rough and careless I could be with them, the way I picked things up, closed doors or dried them in a hurry and I became aware of aches and discomfort. When I noticed this, I’d consciously take a moment to let go of any tension and let my wrists go floppy. Now, if I’m in  my car and stuck in traffic or at lights, then I often turn my wrists over as gently as I can and then back again or I notice if I’m holding the steering wheel with tension, and let my hold become more relaxed. When I’m at work I have a ‘wrist guard’  and a ‘mouse guard’ which is a foam pad to support my wrists as I’m typing, it lets my hands drop down, which feels more supportive to me.  I have recently incorporated a specific stretch for my wrists and hands during my morning exercises, all very simple ways to support my wrists.

It still took some time before I actually sat down to do a massage though, as there was something uncomfortable about massaging my wrists, it feels like such a tender, sensitive part of my body.  I knew I was avoiding it, so I began with just holding or feeling my wrists and then just massaging them without any cream or oil if they ached.

Divinities Touch by Kelly Basford

Eventually I decided I wanted to give my wrists that extra bit of care and attention and I began by mixing a couple of drops of myrrh essential oil into a pot of cream (see my blog on how many drops to use in a blend).  Myrrh is a particularly viscous oil and it can take a really long time for a drop to fall from the bottle* so this process encouraged me to be present and if I noticed I was impatient, then I’d know I really needed to slow down and let the drop fall naturally.  The massage itself only takes a few moments, and I generally apply a little cream in anti-clockwise circles, when I’m in bed in the evening.  Sometimes they feel tender, sore or achey, and I  just notice this, and except that I have been using them a little too harshly and this awareness generally leads to naturally becoming more gentle when I use them.

I’ve been bringing focus to my wrists (as well as hands and finger tips) for some time now, and looking back over the last year, I can really appreciate how the more attention I have bought to this part of my body, the more gentle I have become with them.  It’s in the way I wash my hands, apply lotion afterwards, the way I close doors, chop vegetables, the way I open boxes or do the washing up. I feel the flow of this gentleness beyond my wrists, it’s up my forearms, across my shoulders and even in the way I use my whole body. I am more aware and more gentle than in the past and it continues to deepen. I can really appreciate how beautiful my wrists, hands and fingertips are and often enjoy moving them with grace and delicacy as if I’m dancing.

See my previous blog posts Taking care of your hands and Essential Oils in Hand & Nail care for more related reading.

Click here to buy Myrrh Essential Oil.

*Please note that myrrh essential oil oxidises very easily -this means that it reacts with oxygen, and it actually becomes very very sticky and stiff, so although you do need to be patient when dropping it from the bottle because it is thick, it is possible that it will oxidise and at some point will no longer drop from the bottle. In fact it can reach a point where you can’t get the lid off. Mine never usually lasts this long, but it would depend on how much it is exposed to the air, or if the bottle is close to empty then there is more air that it can react with.

CAUTION: Myrrh essential oil should not be used during pregnancy, I would recommend replacing myrrh with another essential oil to support your wrists for example, rose, frankincense or lavender. In fact, even if you are not pregnant, you may choose another oil that you feel helps you connect or that you particularly enjoy.